In their most simple form, statecharts are a way to structure your application into logical states. A statechart does not need to be implemented in your application’s code; but it is easier to adhere to the statechart you lay out if you are able to create or use a framework that defines:
-
what is possible to do within a state
-
how the application can transition from one state to another
-
and finally what needs to be set up and torn down upon state entry and state exit.
From SproutCore Version 1.5 and onwards, there is a fantastic Statechart framework built right into the library itself– conveniently called SC.Statechart.
To Statechart or Not to Statechart?
For me, there are a couple of main reasons to use statecharts. First, having to sit down and think about your application’s possible states makes you think long and hard about the actual design of your application. Second, splitting a large application into logical (and smaller) states makes it easier to break functional requirements down into manageable parts when it is time to plan and develop the application.
As a final bonus, you end up with a finished application that has one killer feature: separation of concerns between application domains. That last part alone should make you want to invest in using statecharts for your application: cleaner code and less spaghetti.
The State of the Game
There are many ways to structure a statechart application. The statechart needs to have one and only one root state, which you can think of as the initial state of your application.
There are a number of key factors that needs to be included in each state, so that the states can be combined into a statechart.
-
Each state needs to have exactly one clearly defined entry point
-
Each state needs to have at least one clearly defined exit point (the possible transitions available)
-
Each state needs to be able to set up everything required within that state upon state entry
-
Each state needs to be able to tear down anything that is state-specific upon state exit
Note that the above can be considered my guidelines. It’s most certainly possible to break any of the above requirements inside your statechart implementation– however, be prepared that the end result might be messy/spaghetti code, no clear separation of concerns, or worse, both.
An added bonus of using SC.statechart is that you will also be able to build an application where the routes that the user can travel through your application is made explicit in both design and code.
Statecharts and the MVC Model
Since Statecharts will make up a large portion of your application’s architecture, where does it fit into the SproutCore MVC model? Will a Statechart-built application really be something like an MVCS (Model-View-Controller-Statechart) model?
The answer to the first question is that Statecharts fits in beautifully with the SC MVC model. The answer to the MVCS question is: it depends on your viewpoint.
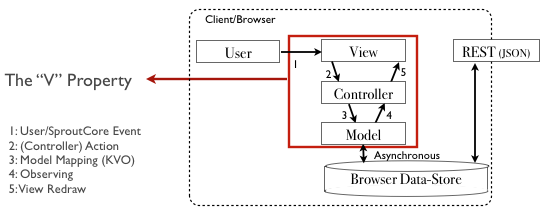
Without statecharts, the SproutCore MVC model looks like the diagram below.
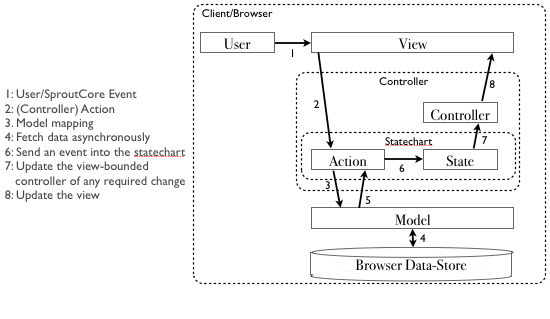
In my opinion, a statechart belongs within the Controller portion of the MVC model, and might look something like the diagram below. Note that both the “Action” and the “Statechart” portions of the Controller layer in the diagram below are application-wide, while the “Controller” portion of the Controller layer refers to the controller that the view binds to (usually a SC.ListController, SC.ItemController, etc., or a custom made controller).
Implementing a Statechart Application
Now, lets looks at the actual implementation of a Statechart application. For this blog post, I will be looking at a portion of the EurekaJ Statechart implementation.
In EurekaJ the actual login and authentication of the application is handled outside of SproutCore (by Spring Security on the Java backend), and so we will make the assumption that the user already is pre-authenticated. Before we get started, though, there are a few key symbols that you need to get acquainted with.
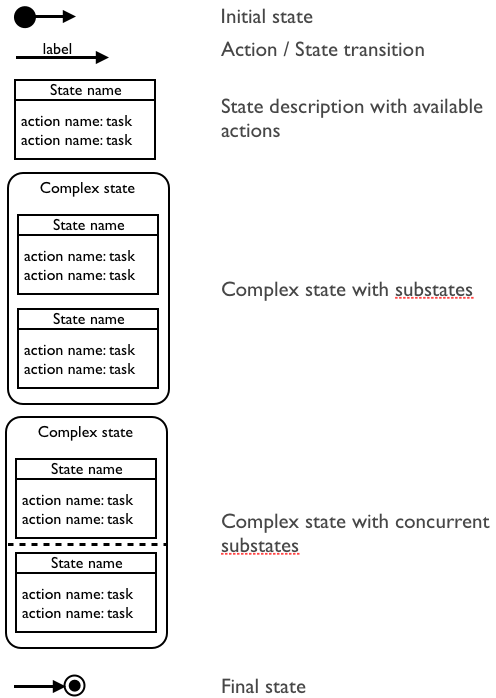
To get started discussing the statechart implementation, let’s first describe how the Graphical User Interface works in the EurekaJ application. The application is split into four main parts. The top panel is responsible for displaying the application logo, as well as a toolbar. The toolbar currently only has a single item, a button that will activate the administration panel.
On the left hand side of the application, there is a sidebar responsible for showing a tree-structure consisting of all nodes that the application is able to display visual charts for.
On the right hand side, there is an information panel that currently has two responsibilities: letting the user select which time-period to display charts for, as well as listing any recent alerts triggered by the system. In the center, the main area of the application, the application will display any of the charts selected in the tree menu to the left, for the time period chosen in the time-period panel to the right.
Schematically the application looks like the diagram below.
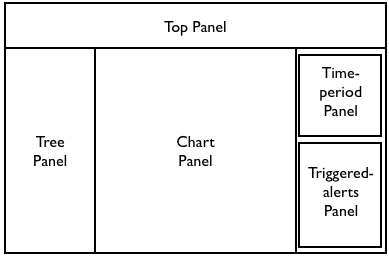
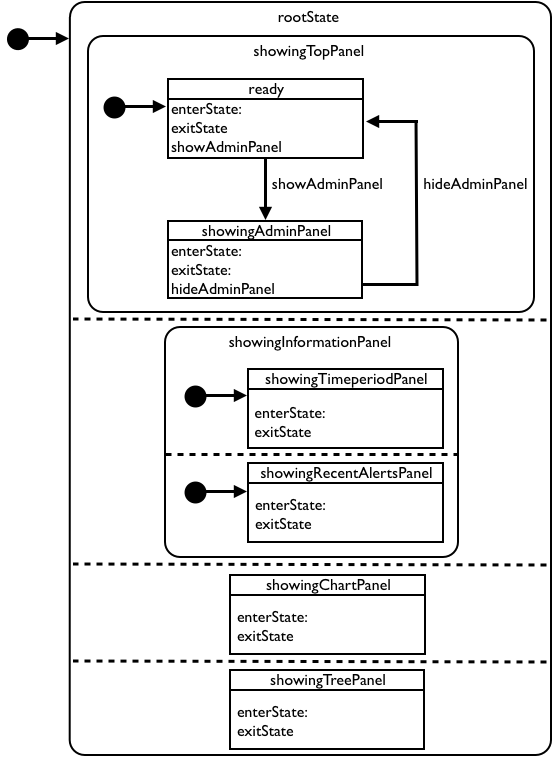
We can immediately identify 6 states that concurrently need to be displayed on the screen, each of which needs to be active and ready for user input. For my application, I decided to make the four states “showingTopPanel”, “showingTreePanel”, “showingChartPanel” and “showingInformationPanel” direct concurrent states of the rootState.
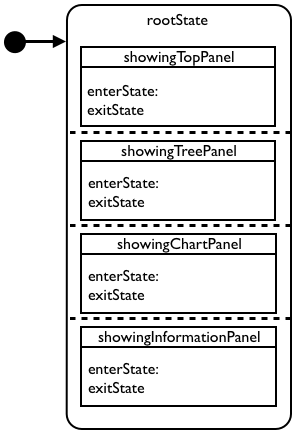
The statechart implementation in the file core_statechart.js thus becomes:
<code><span class="cm">/*globals EurekaJView */</span>

<span class="nx">EurekaJView</span><span class="p">.</span><span class="nx">statechart</span> <span class="o">=</span> <span class="nx">SC</span><span class="p">.</span><span class="nx">Statechart</span><span class="p">.</span><span class="nx">create</span><span class="p">({</span>
    <span class="nx">rootState</span><span class="o">:</span> <span class="nx">SC</span><span class="p">.</span><span class="nx">State</span><span class="p">.</span><span class="nx">design</span><span class="p">({</span>
        <span class="nx">substatesAreConcurrent</span><span class="o">:</span> <span class="nx">YES</span><span class="p">,</span>

        <span class="nx">showingTreePanel</span><span class="o">:</span> <span class="nx">SC</span><span class="p">.</span><span class="nx">State</span><span class="p">.</span><span class="nx">plugin</span><span class="p">(</span><span class="s1">'EurekaJView.showingTreePanel'</span><span class="p">),</span>

        <span class="nx">showingChartPanel</span><span class="o">:</span> <span class="nx">SC</span><span class="p">.</span><span class="nx">State</span><span class="p">.</span><span class="nx">plugin</span><span class="p">(</span><span class="s1">'EurekaJView.showingChartPanel'</span><span class="p">),</span>

        <span class="nx">showingInformationPanel</span><span class="o">:</span> <span class="nx">SC</span><span class="p">.</span><span class="nx">State</span><span class="p">.</span><span class="nx">plugin</span><span class="p">(</span><span class="s1">'EurekaJView.showingInformationPanel'</span><span class="p">),</span>

        <span class="nx">showingTopPanel</span><span class="o">:</span> <span class="nx">SC</span><span class="p">.</span><span class="nx">State</span><span class="p">.</span><span class="nx">plugin</span><span class="p">(</span><span class="s1">'EurekaJView.showingTopPanel'</span><span class="p">)</span>
    <span class="p">})</span>
<span class="p">});</span>
</code>
The important things to notice in the above code are first that each of the four states are extracted into their own JavaScript files; and second, that all states that are defined as children of the rootState are defined as concurrent using the substatesAreConcurrent: YES flag.
Neither the showingTreePanel and the showingChartPanel states are complex, so we will instead have a look at the state “showingTopPanel” in more detail.
In the top panel there is a button on the far right that will allow the user to enter the applications administration panel. When the user clicks the “Administration panel” button, the administration panel is displayed inside a modal panel. Once inside the modal panel, the user is able to leave the panel by clicking on a “Hide Administration Panel” button.
In the above scenario, we have described two states, the top panel’s initial “ready” state, as well as the “showingAdministrationPanel” state. Each state therefore has one action each, as depicted in the diagram below.
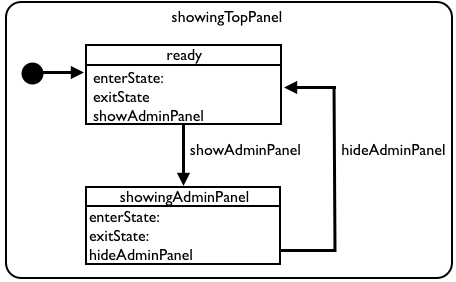
To view the implementation details for the showingTopPanel state, we therefore have to look at the source for the showingTopPanel.js file.
<code><span class="nx">EurekaJView</span><span class="p">.</span><span class="nx">showingTopPanel</span> <span class="o">=</span> <span class="nx">SC</span><span class="p">.</span><span class="nx">State</span><span class="p">.</span><span class="nx">extend</span><span class="p">({</span>
	<span class="nx">initialSubstate</span><span class="o">:</span> <span class="s1">'ready'</span><span class="p">,</span>

    <span class="nx">enterState</span><span class="o">:</span> <span class="kd">function</span><span class="p">()</span> <span class="p">{</span>
        <span class="nx">EurekaJView</span><span class="p">.</span><span class="nx">mainPage</span><span class="p">.</span><span class="nx">get</span><span class="p">(</span><span class="s1">'topView'</span><span class="p">).</span><span class="nx">set</span><span class="p">(</span><span class="s1">'isVisible'</span><span class="p">,</span> <span class="nx">YES</span><span class="p">);</span>
    <span class="p">},</span>

    <span class="nx">exitState</span><span class="o">:</span> <span class="kd">function</span><span class="p">()</span> <span class="p">{</span>
        <span class="nx">EurekaJView</span><span class="p">.</span><span class="nx">mainPage</span><span class="p">.</span><span class="nx">get</span><span class="p">(</span><span class="s1">'topView'</span><span class="p">).</span><span class="nx">set</span><span class="p">(</span><span class="s1">'isVisible'</span><span class="p">,</span> <span class="nx">NO</span><span class="p">);</span>
    <span class="p">},</span>

    <span class="nx">ready</span><span class="o">:</span> <span class="nx">SC</span><span class="p">.</span><span class="nx">State</span><span class="p">.</span><span class="nx">design</span><span class="p">({</span>
    	<span class="nx">showAdministrationPaneAction</span><span class="o">:</span> <span class="kd">function</span><span class="p">()</span> <span class="p">{</span>
			<span class="nx">EurekaJView</span><span class="p">.</span><span class="nx">EurekaJStore</span><span class="p">.</span><span class="nx">find</span><span class="p">(</span><span class="nx">EurekaJView</span><span class="p">.</span><span class="nx">ALERTS_QUERY</span><span class="p">);</span>
			<span class="nx">EurekaJView</span><span class="p">.</span><span class="nx">EurekaJStore</span><span class="p">.</span><span class="nx">find</span><span class="p">(</span><span class="nx">EurekaJView</span><span class="p">.</span><span class="nx">ADMINISTRATION_TREE_QUERY</span><span class="p">);</span>
			<span class="nx">EurekaJView</span><span class="p">.</span><span class="nx">EurekaJStore</span><span class="p">.</span><span class="nx">find</span><span class="p">(</span><span class="nx">EurekaJView</span><span class="p">.</span><span class="nx">INSTRUMENTATION_GROUPS_QUERY</span><span class="p">);</span>
			<span class="nx">EurekaJView</span><span class="p">.</span><span class="nx">EurekaJStore</span><span class="p">.</span><span class="nx">find</span><span class="p">(</span><span class="nx">EurekaJView</span><span class="p">.</span><span class="nx">EMAIL_GROUPS_QUERY</span><span class="p">);</span>

			<span class="nx">EurekaJView</span><span class="p">.</span><span class="nx">updateAlertsAction</span><span class="p">();</span>
			<span class="nx">EurekaJView</span><span class="p">.</span><span class="nx">updateInstrumentationGroupsAction</span><span class="p">();</span>
			<span class="nx">EurekaJView</span><span class="p">.</span><span class="nx">updateEmailGroupsAction</span><span class="p">();</span>
			<span class="k">this</span><span class="p">.</span><span class="nx">gotoState</span><span class="p">(</span><span class="s1">'showingAdminPanel'</span><span class="p">);</span>
    	<span class="p">}</span>
    <span class="p">}),</span>

    <span class="nx">showingAdminPanel</span><span class="o">:</span> <span class="nx">SC</span><span class="p">.</span><span class="nx">State</span><span class="p">.</span><span class="nx">plugin</span><span class="p">(</span><span class="s1">'EurekaJView.showingAdminPanel'</span><span class="p">)</span>
<span class="p">});</span>
</code>
Here, we see that the showingTopPanel state has an initial substate ready. showingTopPanel sets up the view for the state in the enter functions and tears down the state-specific views in the exit function, by toggling the visibility of the top panel itself. The ready state does not have any enter or exit logic, but it has a single action showAdiministrationPanelAction defined that will ensure that data required for the administration panel is fetched from the server before moving on to the showingAdminPanel state.
As the last line suggests, the showingAdminPanel state is defined in its own file showingAdminPanel.js.
<code><span class="nx">EurekaJView</span><span class="p">.</span><span class="nx">showingAdminPanel</span> <span class="o">=</span> <span class="nx">SC</span><span class="p">.</span><span class="nx">State</span><span class="p">.</span><span class="nx">extend</span><span class="p">({</span>
	<span class="nx">hideAdministrationPaneAction</span><span class="o">:</span> <span class="kd">function</span><span class="p">()</span> <span class="p">{</span>
        <span class="k">this</span><span class="p">.</span><span class="nx">gotoState</span><span class="p">(</span><span class="s1">'ready'</span><span class="p">);</span>
    <span class="p">},</span>

    <span class="nx">enterState</span><span class="o">:</span> <span class="kd">function</span><span class="p">()</span> <span class="p">{</span>
        <span class="nx">EurekaJView</span><span class="p">.</span><span class="nx">mainPage</span><span class="p">.</span><span class="nx">get</span><span class="p">(</span><span class="s1">'adminPanelView'</span><span class="p">).</span><span class="nx">append</span><span class="p">();</span>
    <span class="p">},</span>

    <span class="nx">exitState</span><span class="o">:</span> <span class="kd">function</span><span class="p">()</span> <span class="p">{</span>
        <span class="nx">EurekaJView</span><span class="p">.</span><span class="nx">mainPage</span><span class="p">.</span><span class="nx">get</span><span class="p">(</span><span class="s1">'adminPanelView'</span><span class="p">).</span><span class="nx">remove</span><span class="p">();</span>
    <span class="p">}</span>
<span class="p">});</span>
</code>
Here we can see that the EurekaJView.showingAdminPanel state will append and remove the admin modal panel upon state entry and exit. It also has a single action defined that will return to the “ready” state.
Note that with this approach you never have to explicitly call code to either append or remove the adminPanelView from the application– this is done implicitly by letting the state take care of state setup and state teardown. If the administration panel gets additional requirements later on regarding state entry and exit it is easy to know just where to go inside the code to make the change.
By now, you are hopefully starting to see a pattern with the statechart approach to state specification and management within a RIA application, as well as starting to see the benefit of designing your GUI application around statecharts. I won’t bore you with the implementation details of the other states, as they are all structured in a similar manner. I will however, leave you with a diagram of the final statechart for the EurekaJ application. If you do want to have a look at the source code, though, EurekaJ is open sources with the GPLv2 license, and the source code is available from GitHub/joachimhs/EurekaJ. There is also an online demo of the EurekaJ application available at http://eurekaj-ec2.haagen.name/, where you can log in with the username ‘user’ and the password ‘user’.
