Video from the July SF Meetup - SproutCore UI and Community Q&A

written by mdouglas

Thanks to everyone who came out for the SF SproutCore Meetup this past Tuesday! For those of you who couldn’t make it, Majd Taby gave a talk about what’s coming in SproutCore UI; afterward, we had a town hall meeting about SproutCore 2.0 and a variety of other questions from the community. We even had Yehuda Katz give an impromptu presentation!

We’ve included video from the talk and from the Q&A; below. Thanks again to our friends at Yelp for providing us with pizza, beer, and a recording with audio so clear it sparkles!

Check out Majd’s talk on SproutCore UI:

You can follow along with his slides, available here.

Here’s the Q&A; that followed:

One of our first community questions, about choosing which version of SproutCore to use:

There are more questions and answers from the evening’s town hall online on the SproutCore Vimeo account. Take a look–they might have answered your questions!


Other meetups this month:

  • Kuala Lumpur, July 23, featuring a remote talk by Greg Moeck!

  • Vancouver, July 26, featuring talks by Tom Dale and community member Luis Sala!

The Run Loop: Part 2

written by tkeating

Previously, we delved into the operation of SproutCore’s RunLoop, a powerful mechanism that we rarely work with directly. While understanding the function of the Run Loop is akin to understanding the function of your vehicle’s transmission– you don’t need to know how it works in order to go really fast – they both definitely help you go really fast.

So, as promised in the last post, let’s look a bit further at what we get out of having a Run Loop in SproutCore.

You DOM the Truth? You DOM the Truth!? The DOM can’t handle the Truth!

In a lot of web applications, the first wall that developers hit as the application grows in complexity is that they can no longer keep data synchronized throughout the application. This is typically because they’re using selectors to pull and push data to and from the DOM and it quickly gets out of hand, in particular when you add the complexity of synchronization with a backend and multiple event entry points.

SproutCore’s answer to this has always been that the application has a single “truth” which is maintained in the Model layer. To represent a change in the View layer, you make a change to the underlying Model data and let bindings take care of the rest. So why mention this in a post about the Run Loop? Well, partially because I had that possibly hilarious “DOM the truth” subtitle lined up, but mostly it’s because it’s easy to imagine that an improper MVC implementation could still result in inconsistencies between the View and Models. Therefore I wanted to re-highlight a component of the Run Loop’s function that was touched on in the previous post, which is to recursively flush all the bound properties until the application’s state is guaranteed to be in sync.

For instance, suppose property A is bound to property B and property B is bound to property C. With SproutCore, when we change property C, we know that by the end of the current Run Loop, the change will have propagated fully such that property A is correct. This is important, because there are several ways to have a property change, and as a developer you shouldn’t have to provide for every possible event, callback or expired timer.

So the Run Loop helps make MVC work, and that’s nice, and I have a little warm feeling in my heart or possibly pancreas, but really how does this make my application faster?

The Sauce that Makes SproutCore Apps Faster

So what happens when we want to render our data? Take the Todos example for instance, Getting Started with SproutCore 2.0. You’ll notice that there is a “Mark All as Done” checkbox that is bound to the controller’s allAreDone property. By setting the value of allAreDone, it will in turn set each of the item’s isDone values to match. You’ll also notice that the remaining property will also change as each item’s isDone property changes, and that this is bound to the remainingString of the StatsView.

To summarize, if we have 100 items in our Todos list, checking allAreDone is going to change 100 isDone properties. If we traversed and updated the DOM to display remainingString each of these times, we would have a serious problem on our hands. This is where the Run Loop comes in.

Although the StatsView is bound to remainingString, because we have ordered execution within the RunLoop, SproutCore can delay rendering any views until after all of the bindings have flushed. This means that once the bindings have flushed, StatsView will be rendered, remainingString will be calculated once, and we only traverse and update the DOM once for those 100 changes!

This is a very important piece of SproutCore’s architecture and shouldn’t be taken lightly, because what this means is that even the most complex web applications with several hundred bindings can still remain fast. This is, as far as I know, unique among JavaScript MVC frameworks.

Conclusion

Thanks for following along. Now that we’ve explored all that the Run Loop does, how it does it, and why it does it, you can feel free to tuck it in the back of your brain knowing that as long as you are using SproutCore with a proper MVC architecture and bindings, your app will run faster than it would with any other JavaScript framework.

Scrolling in SproutCore: Part 2

written by tevans

Continued from last week’s post “Scrolling in SproutCore”. Tim presents his solution for making SC.ScrollView feel awesome.


I began discussing possible solutions to the problem with Colin Campbell, who pointed me in the direction of Cappuccino as a reference implementation. Cappuccino’s scroll views were buttery smooth and offered all of the benefits that SproutCore needs. So, I began investigating.

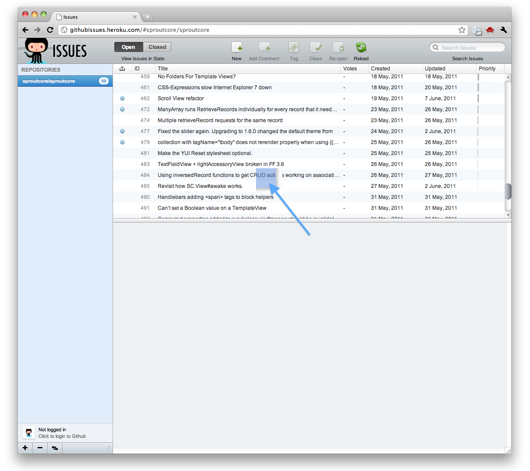
This is what I found: See that blue box in the center of the screen - the one that I pointed an arrow to? This is how Cappuccino applications take scroll events. Normally, you’ll never see this because it has an opacity of 0, and its purpose is to swallow scroll events. Yes. This little element, which I’ll call the scroll catcher for the remainder of this discussion, takes in scroll events and then creates normalized events from it. To remove any ambiguity on how they do scrolling, here’s the code that turns scrolling into cross-platform events (with some minor omissions so we can focus on the problem at hand):

    // We lag 1 event behind without this timeout.
    setTimeout(function()
    {
        // Find the scroll delta
        var deltaX = _DOMScrollingElement.scrollLeft - 150,
            deltaY = _DOMScrollingElement.scrollTop - 150;

        // If we scroll super with momentum,
        // there are so many events going off that
        // a tiny percent don't actually have any deltas.
        //
        // This does *not* make scrolling appear sluggish,
        // it just seems like that is something that happens.
        //
        // We get free performance boost if we skip sending these events,
        // as sending a scroll event with no deltas doesn't do anything.
        if (deltaX || deltaY)
        {
            event._deltaX = deltaX;
            event._deltaY = deltaY;

            [CPApp sendEvent:event];
        }

        // Reset the DOM elements scroll offset
        _DOMScrollingElement.scrollLeft = 150;
        _DOMScrollingElement.scrollTop = 150;
    }, 0);

The scroll catcher sets its position to 150 pixels in. After that, it waits until the next event loop and then calculates the delta from the center of the element, firing off a simulated scroll event into Cappuccino using the calculated delta values. Lather, rinse, repeat.

This approach seems like it could work! When beginning an implementation that did exactly this (essentially converting the Objective-J code into JavaScript), there were a few hurdles that made it plain that this approach couldn’t work well for SproutCore.

First of all, SproutCore uses the target DOM element found on native events to shoot the event off to the given view. It’s really optimal for SproutCore to do this because it has a reverse hash lookup to get the view for a given element ID. Using this approach, all events after the first one will end up having a target of the scroll catcher. But we don’t want that. We want the element directly underneath it.

To find that element, SproutCore needs a way to find a view given a point on the page. There’s a function for that, elementFromPoint, but I’ve found that it’s not a satisfactory solution because you still need to toggle the visibility of the scroll catcher. If we could get this working, then this solution could leave SproutCore with solid mouseWheel events for the whole framework. However, for optimization purposes, this solution is not the best since it requires touching the DOM a lot.

Here’s the idea that I’ve implemented as a working replacement for the current SC.ScrollView:

  • make SC.ScrollView scrollable by native events

  • hide native scrollbars by making them just out of view (so we can maintain themes)

  • and proxy the scroll events so SproutCore will be notified about scroll events happening

If you follow what’s going on with this solution, you’ll find that it runs contrary to SproutCore philosophy that “truth is in JavaScript, not the DOM”.

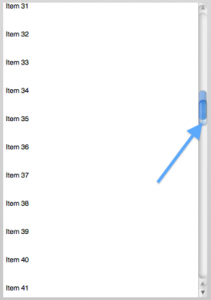
For a better idea of how this is working, here’s a picture:

I’ve made SproutCore’s scrollbars transparent so you can see how this is working. You’ll see that the native scrollbar here is hidden behind SproutCore’s. You can guess that, from here it works like normal scrolling. The only difference is that the DOM notifies SproutCore that it scrolled and therefore reality must be a duality. SproutCore holds the same truth as the DOM through syncing.

Here’s what the syncing looks like:

  /**
    The current horizontal scroll offset.
    Changing this value will update both the `contentView`
    and the horizontal scroller, if there is one.

    @field
    @type Number
    @default 0
   */
  horizontalScrollOffset: function (key, value) {
    if (arguments.length === 2) {
      var minOffset = this.minimumHorizontalScrollOffset(),
          maxOffset = this.get('maximumHorizontalScrollOffset'),
          layer = this.getPath('containerView.layer'),
          offset = Math.max(minOffset, Math.min(maxOffset, value));

      this._scroll_horizontalScrollOffset = offset;
      if (layer && layer.scrollLeft !== offset) {
        layer.scrollLeft = offset;
      }
    }

    return this._scroll_horizontalScrollOffset || 0;
  }.property().cacheable(),

  /**
    The current vertical scroll offset.
    Changing this value will update both the `contentView`
    and the vertical scroller, if there is one.

    @field
    @type Number
    @default 0
   */
  verticalScrollOffset: function (key, value) {
    if (arguments.length === 2) {
      var minOffset = this.get('minimumVerticalScrollOffset'),
          maxOffset = this.get('maximumVerticalScrollOffset'),
          layer = this.getPath('containerView.layer'),
          offset = Math.max(minOffset, Math.min(maxOffset, value));

      this._scroll_verticalScrollOffset = offset;
      if (layer && layer.scrollTop !== offset) {
        layer.scrollTop = offset;
      }
    }

    return this._scroll_verticalScrollOffset || 0;
  }.property().cacheable(),

The properties for verticalScrollOffset and horizontalScrollOffset are changed, so they will set scrollTop and scrollLeft. This is done so we don’t end up recursing forever when we want to scroll (something that I’ve encountered when trying to proxy scroll offsets properly).

When the user scrolls, I’ve set up an event handler for scroll events, which ends up in the following function:

    /** @private
      Notify the container that the scroll offsets have changed.
     */
    scroll: function (evt) {
      var layer = this.get('layer'),
          scrollTop = layer.scrollTop,
          scrollLeft = layer.scrollLeft,
          parentView = this.get('parentView');

      // I'm using `verticalScrollOffset` and `horizontalScrollOffset`
      // as proxies for the the actual scroll offsets.

      // Since we know what the offsets are (we got the event), this
      // needs to set the cached value, and let properties know that
      // the offset changed.
      if (parentView._scroll_verticalScrollOffset !== scrollTop) {
        parentView.propertyWillChange('verticalScrollOffset');
        parentView._scroll_verticalScrollOffset = scrollTop;
        parentView.propertyDidChange('verticalScrollOffset');
      }

      if (parentView._scroll_horizontalScrollOffset !== scrollLeft) {
        parentView.propertyWillChange('horizontalScrollOffset');
        parentView._scroll_horizontalScrollOffset = scrollLeft;
        parentView.propertyDidChange('horizontalScrollOffset');
      }

      return parentView.get('canScrollHorizontal') || parentView.get('canScrollVertical');
    }

This is a bit tricky right here. There’s a manually cached value for the scroll offsets that gets updated on sets, but also sets the scroll offset for the element. I don’t want to set the scroll offset- I just want to notify the ScrollView that its value updated. So I change the internal cached value and notify SproutCore that the value changed. And voilà- scroll events proxying between SproutCore and the DOM seamlessly!

There’s another benefit that comes along with this approach. Since I’m syncing the DOM and SproutCore, you can use native scrollbars. You can do so using a flag called wantsNativeScrollbars, which will use native scrollbars instead of rendering Ace’s scrollbars.

There is a downside to this approach. When rendering collections, SproutCore can’t update the views fast enough to make sure that that the list always seems complete. With sufficiently complex item views, scrolling can be full of hitches. In the end, this means that incremental rendering will be a bit more noticeable than with the previous approach. SproutCore has no “heads-up” when scrolling is about to happen, just that it happened. We’ve encountered this in an application we’re working on and are trying to think up some ways to make scrolling work better.


This post is by Tim Evans, software engineer for OnSIP Hosted PBX.

Scrolling in SproutCore

written by tevans

Converting native widgets into SproutCore compatible widgets can be an adventure, especially if the browser vendors don’t agree on the events that the widget produces. Scrollable elements are one of those things.

For those of you who find SproutCore’s ScrollView insufferable on various platforms because it’s not scrolling how you expect it to, this should shed some light on how really hard the problem actually is. And, hopefully you’ll be satisfied with the solution that I propose.

First, let me answer the question of why… Why, that is, SproutCore needs its own ScrollView. There are two primary reasons for this: cosmetic and performance.

The cosmetic reason is theming. SproutCore has the ability to skin pretty much everything in your application, including scrollbars. This gives a consistent look and feel across platforms and eases the headache of UI consistency. However, some people want their applications to have the native look and feel. The current implementation of SC.ScrollView doesn’t allow that. This can be a turnoff, especially when mixing-and-matching SC.ScrollView and native scroll views. It creates inconsistency, which leads to bad user interaction.

SproutCore prides itself on being able to render gigantic lists of items without hosing your browser. It does this by incrementally rendering the list. This means that what you see is all there is with SC.ListView. Anything you can’t see is not actually rendered in the DOM. Implementing this requires SproutCore to know about the clipping frame (the rectangle that gives the information on what’s currently visible). To get the clipping frame, SproutCore needs to observe when scrolling happens. Hence, SC.ScrollView.

Now for a quick dig into the internals of how 1.x SC.ScrollView works in “desktop” mode, so when we start looking at our solutions, we know what stuff is changing.

I’m going to take it backwards from where the scrollTop and scrollLeft are set in the DOM being controlled by SC.ScrollView. For those of you who’d like to follow along, I’m looking at the adjustElementScroll function in scroll.js in the desktop framework.

I’m going to break this down, ‘cause this function contains the core of what makes SC.ScrollView tick.

  /** @private
    Called at the end of the run loop to actually adjust the scrollTop
    and scrollLeft properties of the container view.
  */
  adjustElementScroll: function() {
    var container = this.get('containerView'),
        content = this.get('contentView'),
        verticalScrollOffset = this.get('verticalScrollOffset'),
        horizontalScrollOffset = this.get('horizontalScrollOffset');

Pretty self-explanatory, continuing on…

    // We notify the content view that its frame property has changed
    // before we actually update the scrollTop/scrollLeft properties.
    // This gives views that use incremental rendering a chance to render
    // newly-appearing elements before they come into view.
    if (content) {
      // Use accelerated drawing if the browser supports it
      if (SC.platform.touch) {
        this._applyCSSTransforms(content.get('layer'));
      }

      if (content._viewFrameDidChange) { content._viewFrameDidChange(); }
    }

Here’s the first interesting bit. Ignoring the accelerated drawing, which is for the touch version of SC.ScrollView, we have the last line calling content._viewFrameDidChange. Hmm. What does that do? Let’s take a respite from this function and find out what _viewFrameDidChange does. Digging around, you find the function call in core_foundation/views/view/layout.js. This function is pretty straightforward:

  /** @private
    Invoked by other views to notify this view that its frame has changed.

    This notifies the view that its frame property has changed,
    then propagates those changes to its child views.
  */
  _viewFrameDidChange: function() {
    this.notifyPropertyChange('frame');
    this._sc_view_clippingFrameDidChange();
  }

So this let’s the view know that it’s frame changed, then makes a call down to _sc_view_clippingFrameDidChange. Digging again, we end up in core_foundation/views/view.js.

/** @private
    This method is invoked whenever the clippingFrame changes, notifying
    each child view that its clippingFrame has also changed.
  */
  _sc_view_clippingFrameDidChange: function() {
    var cvs = this.get('childViews'), len = cvs.length, idx, cv ;
    for (idx=0; idx<len; ++idx) {
      cv = cvs[idx] ;

      cv.notifyPropertyChange('clippingFrame') ;
      cv._sc_view_clippingFrameDidChange();
    }
  }

This code is also fairly straightforward. It simply notifies all views that are descendants of the current one that their clippingFrame changed.

Back to adjustElementScroll, we’re at the point where the content is notified that the scroll offset did change. This lets the child view know beforehand that it is going to scroll. This is used to make incremental rendering of collection views appear seamless to the user (effectively making collections look like continuous for most platforms).

Here’s the last part of adjustElementScroll:

if (container && !SC.platform.touch) {
      container = container.$()[0];
      
      if (container) {
        if (verticalScrollOffset !== this._verticalScrollOffset) {
          container.scrollTop = verticalScrollOffset;
          this._verticalScrollOffset = verticalScrollOffset;
        }

        if (horizontalScrollOffset !== this._horizontalScrollOffset) {
          container.scrollLeft = horizontalScrollOffset;
          this._horizontalScrollOffset = horizontalScrollOffset;
        }
      }
  },

Aha! See scrollTop and scrollLeft getting set? That’s where the view gets scrolled. The next step is to see what triggers this function to be called.

Just above adjustElementScroll are two functions that invoke it, when horizontalScrollOffset or verticalScrollOffset change. For those familiar with the SproutCore adage “reality is in JavaScript, not the DOM”, this is one great example of it being put to use to great benefit.

I’m going to save some time and jump to where scroll events are handled, in mouseWheel.

Inside the code for mouseWheel and its dependent function _scroll_mouseWheel, there are some curious things happening. The first line of the mouseWheel function has a delta adjust for webkit browsers that mutates the event from the browser. This is the first glimpse at how troublesome scrolling is for SproutCore. We’re going to dig into SC.Event to get the rest of the story of how scroll events are dealt with.

Walking through SC.Event (in core_foundation/system/event.js), we find this code relating to scroll events:

// Normalize wheel delta values for mousewheel events
  if (this.type === 'mousewheel' || this.type === 'DOMMouseScroll' || this.type === 'MozMousePixelScroll') {
    var deltaMultiplier = SC.Event.MOUSE_WHEEL_MULTIPLIER,
        version = parseFloat(SC.browser.version);

    // normalize wheelDelta, wheelDeltaX, & wheelDeltaY for Safari
    if (SC.browser.webkit && originalEvent.wheelDelta !== undefined) {
      this.wheelDelta = 0-(originalEvent.wheelDeltaY || originalEvent.wheelDeltaX);
      this.wheelDeltaY = 0-(originalEvent.wheelDeltaY||0);
      this.wheelDeltaX = 0-(originalEvent.wheelDeltaX||0);

    // normalize wheelDelta for Firefox
    // note that we multiple the delta on FF to make it's acceleration more 
    // natural.
    } else if (!SC.none(originalEvent.detail) && SC.browser.mozilla) {
      if (originalEvent.axis && (originalEvent.axis === originalEvent.HORIZONTAL_AXIS)) {
        this.wheelDeltaX = originalEvent.detail;
        this.wheelDeltaY = this.wheelDelta = 0;
      } else {
        this.wheelDeltaY = this.wheelDelta = originalEvent.detail ;
        this.wheelDeltaX = 0 ;
      }

    // handle all other legacy browser
    } else {
      this.wheelDelta = this.wheelDeltaY = SC.browser.msie || SC.browser.opera ? 0-originalEvent.wheelDelta : originalEvent.wheelDelta ;
      this.wheelDeltaX = 0 ;
    }

    // we have a value over the limit and it wasn't caught when we generated MOUSE_WHEEL_MULTIPLIER
    // this will happen as new Webkit-based browsers are released and we haven't covered them off
    // in our browser detection. It'll scroll too quickly the first time, but we might as well learn
    // and change our handling for the next scroll
    if (this.wheelDelta > SC.Event.MOUSE_WHEEL_DELTA_LIMIT && !SC.Event._MOUSE_WHEEL_LIMIT_INVALIDATED) {
      deltaMultiplier = SC.Event.MOUSE_WHEEL_MULTIPLIER = 0.004;
      SC.Event._MOUSE_WHEEL_LIMIT_INVALIDATED = YES;
    }

    this.wheelDelta *= deltaMultiplier;
    this.wheelDeltaX *= deltaMultiplier;
    this.wheelDeltaY *= deltaMultiplier;
  }

I think that this code speaks for itself, showing how complex and inconsistent scroll events are. There is no unanimous agreement across browser vendors as to how scroll events should be interpreted. There are some standard ways that they should be interpreted for traditional mice, but this uniformity breaks down when using pixel precise input devices like the ones found on Apple’s current generation of devices (magic trackpad / magic mouse, etc.).

These new devices are new to the industry, so browser vendors are trying to figure out a way to interpret the events. Unfortunately, there hasn’t been any agreement on what the events should look like. This means that as the code stands now, members of the core team have to test browsers that support these devices and ensure that they have equivalent (or similar) behavior to the native widgets.

As of now, the current state of SC.ScrollView is tightly coupled to browsers, down to specific versions of them, to correctly compute scroll events. The views don’t feel as responsive as they do in native applications, and it hiccups every once in a while, resulting in a user experience that is… well, lacking.

I think that SproutCore can do better, so I started brainstorming ideas of how to make SC.ScrollView feel awesome.


This post is by Tim Evans, software engineer for OnSIP Hosted PBX.

Stay tuned for next week’s post, where Tim will walk you through his solution to scrolling in SproutCore.

Structuring Your SproutCore Application: Part 1

written by ccampbell

This is the first in a series of posts that recap Colin’s talk at the San Francisco Meetup 6/14 and go into some detail about structuring a SproutCore application. Stay tuned for more posts in this series, and, as always, we’re listening to your feedback- let us know where you’re confused or what you want to learn more about.


Building applications that scale well is very important, but “scaling well” isn’t limited to ensuring your servers can handle the load. It is equally important to structure your application so that you can easily maintain your code and introduce new functionality without needing to rewrite significant portions. There are libraries provided by SproutCore, like the statechart library, that will help your application grow smoothly.

Let’s dive into how to structure your SproutCore application so that it’s maintainable and can grow with your project. In Part 1, I’ll be covering how to set up your application so that you will be able to add functionality later with minimal refactoring.

Introduction

We’ll be going through an application I built for the SproutCore San Francisco Meetup earlier this month. It is available on Github.
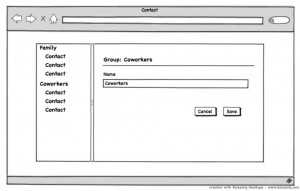
To get started, let’s generate the application using the following command:

sc-init Contact --template

As you can see, we’ve named our application Contact and we’re choosing to use the new HTML-based application structure. We’re going to be developing this SproutCore 1.6 application so that we can upgrade it to the SproutCore 2.0 stream eventually. That means using SC.TemplateView for all of our content views, and limiting our usage of other views that rely on layout. To get set up with the repository that is on Github, clone the repository by running

git clone git://github.com/ColinCampbell/Contact.git

Now that we’ve got an application set up, let’s take a look at the pieces that SproutCore provides and how they fit together. Here’s a general overview:

  • DataStore framework to manage your data

  • SC.View/SC.TemplateView to create your UI

  • SC.ArrayController/SC.ObjectController to connect your data to your views

  • SC.Statechart to manage your application logic

Let’s start building an app and see how to write maintainable code in SproutCore.

Adding Initial DataStore Code

The first thing you’ll do when you’re developing an application is introduce some models and a store to manage the data that you’ve loaded. For this application, we’re going to provide the data for the application by using fixtures, which allows you to bootstrap your SproutCore application with data that isn’t provided from a server or API. If you’re following along with the prebuilt repository, check out the step1 branch by running

git checkout step1

In the contact.js file, we’ve added the store object on the application’s namespace.

		Contact = SC.Application.create({
		  store: SC.Store.create().from('Contact.FixturesDataSource')
		});

This will give you access to the store from anywhere in the application code. If you check the contents of the models/ folder inside the application’s directory, you’ll see we’ve introduced the Contact.Person and Contact.Group models.

	// in apps/contact/models/group.js:


		Contact.Group = SC.Record.extend({
			name: SC.Record.attr(String),
			people: SC.Record.toMany('Contact.Person', {inverse: 'group'})
		});


	// in apps/contact/models/person.js


		Contact.Person = SC.Record.extend(
			firstName: SC.Record.attr(String, {defaultValue: "Señor"}),
			fullName: function() {
			  var firstName = this.get('firstName'),
        			  lastName = this.get('lastName');

   			   return firstName + ' ' + lastName;
			}.property('firstName', 'lastName').cacheable(),
			group: SC.Record.toOne('Contact.Group', {inverse: 'people'}),
			lastName: SC.Record.attr(String)
		});

The attributes for these models allow for names, and we’ve also added a relationship so we can connect a Group to many Person records. We’ve also built some fixture data for these models, which you can see in the fixtures folder. Now that we’ve covered the beginning of the data layer for our application, let’s build out the views.

Scaffolding The View Layer

The next step in bootstrapping our application is to rough out the views that we’ll want. Check out the second step in the git repository by running

git checkout step2

Looking at the contact.js file again, you’ll see we’ve introduced the Contact.pane object, which will serve as our main view for the application. It contains a sidebar, where we’ll list the groups and people, and an SC.ContainerView, which we’ll use to swap out views that will allow us to edit Contact.Group or Contact.Person records. Those views, which are going to be based on SC.TemplateView, are below the pane object.

		Contact.pane = SC.Pane.create({
			layout: {centerX: 0, centerY: 0, height: 400, width: 800},
			childViews: ['sidebar', 'contentView'],
			classNames: ['app'],
			defaultResponder: 'Contact.statechart',
			sidebar: SC.View.design({
    				layout: {width: 200},
    				childViews: ['sidebar'],
    				classNames: ['sidebar'],

    				sidebar: SC.TemplateView.design({
      					templateName: 'sidebar'
    				})
  			}),

  			contentView: SC.ContainerView.design({
    				layout: {left: 201},
    				nowShowingBinding: 'Contact.displayController.nowShowing'
  			})
		});

		Contact.groupView = SC.TemplateView.create({
  			classNames: ['group'],
  			contentBinding: 'Contact.groupController',
  			templateName: 'group'
		});

		Contact.personView = SC.TemplateView.create({
  			classNames: ['person'],
  			contentBinding: 'Contact.personController',
  			templateName: 'person'
		});

For our content views, we’re going to use SC.TemplateView. This allows you to declare your views using the Handlebars templating system. As you can see in the definition of Contact.groupView and Contact.personView, we’re providing templateName values which correspond to the name of files containing those templates. For example, in apps/contact/resources/templates/group.handlebars, we’ve defined the Handlebars template to show in the Contact.groupView view:

		<h2>Group: {{content.name}}</h2>

		<ul class="form">
		  <li>
		    <label for="name">Name:</label>
		    {{view SC.TextField name="name" valueBinding="Contact.groupController.name"}}
		  </li>
		</ul>

		<div class="buttons">
		  {{#view SC.Button action="cancel" classNames="button cancel"}}
		    Cancel
		  {{/view}}
		  {{#view SC.Button action="save" classNames="button save"}}
		    Save
		  {{/view}}
		</div>

There are a few things to notice here.

First, in our header for the view, we’re binding to the content.name property. When we defined the Contact.groupView above, we bound its content property to the Contact.groupController object. This means that when this template renders, it will use the currently selected group’s name in the header, and this will automatically update when that controller’s content is changed.

We’re also using some views that SproutCore provides to easily handle rendering input fields and buttons. We’ve bound the SC.TextField for changing a name to the Contact.groupController’s name property. Now that we’ve built the initial view structure to represent the UI layer of our application, we need to build out the controllers and statechart so our application can function.

Controllers and Statecharts

If you’re following along using the Git repository, checkout the step3 branch by running

git checkout step3

In this step, we’re going to build out our controller layer, as well as the initial structure of our statechart. Looking to the controllers/ folder, you’ll see we’ve added SC.ObjectControllers and SC.ArrayControllers to handling wiring our data for our views.

In contact.js, we’ve also added the initial statechart structure for our application:

		Contact.statechart = SC.Statechart.create({
  			autoInitStatechart: false,
  			rootState: SC.State.design({
    				initialSubstate: 'ready',
   				signIn: SC.State.plugin('Contact.SignInState'),
    				ready: SC.State.plugin('Contact.ReadyState')
  			})
		});

Here, we create the statechart by calling SC.Statechart.create(). We want to wait until the ready event to actually start our statechart, so we set autoInitStatechart to false.

We’re going to implement two main states, a signIn state and a ready state, but for now, we just want to enter the ready state. This state will represent the application once the user has been authenticated and the main application is shown.

You’ll notice that we’ve removed the Contact.pane.append calls from the main file, and moved them into the ReadyState, which is defined in apps/contact/states/ready.js. This means the pane will get appended when that state is entered and removed when it is exited.

Continuing On

Now that we’ve got the initial application structure completed, we can start implementing some functionality. In the next post, I’ll be showing how to load your data, display it to the user by setting the controllers’ content, and modify groups and people using the templates we’ve already defined.