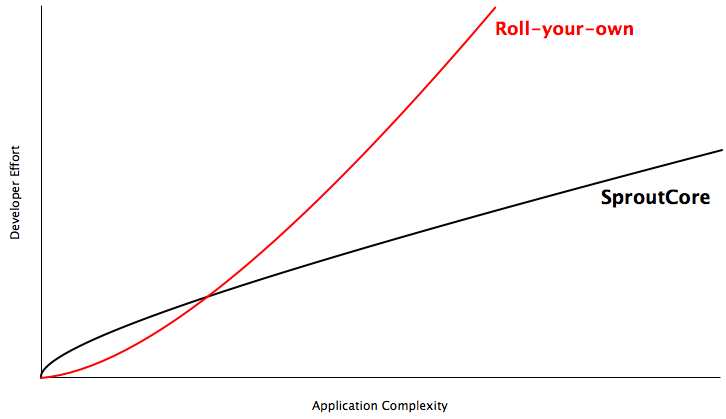
In Part 1, we started developing a Contact application for managing groups and people. Continuing with Part 2, we’re going to be implementing the application’s functionality in a way that’s going to scale with its complexity.
Loading The Application’s Data
Now that we have the base of our application, we need to start by loading some data into the application. Before we proceed, let’s make sure we’re on the same page. Check out step 4:
We’re going to do this using SC.FixturesDataSource. It allows you to use fixture data local to your application, but also simulates remote responses. That means when you implement a connection to a remote server, your application works as expected. Let’s create the FixturesDataSource in apps/contact/data_sources/fixtures.js:
	Contact.FixturesDataSource = SC.FixturesDataSource.extend({
	  simulateRemoteResponse: YES,
	  latency: 250
	});
We’ve defined a new FixturesDataSource class, turned on the simulation of remote responses, and set the latency to 250ms. This is a typical amount of latency between a client and a server but you can tweak this number to suit your needs.
The last thing we need to do is make our application’s store object load its data using the new data source. This is done by going into apps/contact/contact.js and changing the store’s definition to the following:
	Contact = SC.Application.create({
	  store: SC.Store.create().from('Contact.FixturesDataSource')
	});
Now we have the data loading asynchronously from the server. Let’s implement some logic to load the data into the application. We’ll do this in a state that occurs when the application is ready to be used, so we can potentially display a loading indicator, but this pattern should also be usable if you want to go straight into the application and load the data using a different UI. Inside our ReadyState in apps/contact/states/ready.js, we’re going to add a loading substate and declare it as our initialSubstate.
	Contact.ReadyState = SC.State.extend({
	  initialSubstate: 'loading'
	});
This is going to make sure that when the application becomes ready (ie. enters the ready state), we go into the loading substate and start loading data. To load the data, we’re going to use the DataStore API. We first create a query for a record type – you can add filtering at this level so the query only manages certain records.
var query = SC.Query.local(Contact.Group);
This query will fetch all of the Contact.Group records. We execute this query and load data from the server by passing it to the application’s store:
var data = Contact.store.find(query);
This is going to execute the fetch function on our FixturesDataSource (the default one loads the records into the store, so we don’t need to implement this ourselves). The data object is going to be a SC.RecordArray, which wraps an array of records and provides some nice abstractions. We need to observe the status property on the data object so we know when its records have been loaded into the store.
Once that is done, we’re going to want to set the content of an SC.ArrayController, and let the parent state know that we finished loading the data for the record type (because we’re going to load multiple things and they may not load in order):
	data.addObserver('status', this, function observer() {
 	 if (data.get('status') === SC.Record.READY_CLEAN) {
	    data.removeObserver('status', this, observer);
	    Contact.groupsController.set('content', data);
	    this.get('statechart').invokeStateMethod('dataLoaded');
	  }
	});
Once this is done, we change the statechart to the none state. This state represents the application when the data has been loaded and we’re waiting for user interaction.
Adding Application State
Let’s move on to step 5:
Now we need to implement the UI so that we can allow the user to interact with the application. The statechart is going to receive actions, and, based on those actions, will coordinate changes to the application.
Our application has two substates once we’re ready to receive user actions: we want to show a screen for editing groups, and we screen for editing people. Thus, we add two substates to the none state. In these substates, we want to change the Contact.displayController so the UI will update and display the correct view:
    group: SC.State.design({
      enterState: function() {
        Contact.displayController.set('nowShowing', 'Contact.groupView');
      }
    }),

    person: SC.State.design({
      enterState: function() {
        Contact.displayController.set('nowShowing', 'Contact.personView');
      }
    })
However, we still need to allow the statechart to enter and exit these states. You do this by adding actions – functions on the statechart that call gotoState. We need one for both the group and person, and they should be added to the none state because the user can switch to a user or person from any of its substates.
    showGroup: function() {
      this.gotoState('ready.none.group');
      return YES;
    },

    showPerson: function() {
      this.gotoState('ready.none.person');
      return YES;
    }
We’ve now implemented our statechart logic.
Styling
In step 6, we’re going to implement some styling changes, and some other small fixes. I’ll allow you to review the code on the repository.
Nested Stores and Saving Data
For applications that have editing functionality, some of the time you’ll want to wait until the user saves changes to persist that to the server. You’ll also want an easy way of discarding the changes made by the user if they cancel their changes. SproutCore’s DataStore framework provides the concept of nested store to allow you to bake this functionality into your app quickly and easily. Let’s check out step 7:
Whenever we enter the group or person state (i.e., start editing records of those types), we’ll want to create a nested store to buffer the changes.
store = Contact.store.chain();
We need to make sure that the record the user is editing is from the nested store, not the parent store. To do this, we simply use store.find(Contact.Group, guid); to get the record from the nested store. We now need to set up the actions that will get called from our “Save” and “Cancel” buttons:
	cancel: function() {
	  this._store.discardChanges();
	},

	save: function() {
	  this._store.commitRecords(true);
	}
As you can see, we called store.discardChanges() to get rid of changes and store.commitRecords() to save them to the parent store. We also need to make sure we get rid of any changes and destroy the nested store when we exit the current state:
	exitState: function() {
	  this._store.discardChanges().destroy();
	}
Adding a Sign In Page
Now that we have the in-application features implemented, let’s add a login page. Check out step 8:
Let’s review the changes we’ve made in this step. First, we want to make sure that the app enters the signIn state when it starts, not the ready state. We also need to the add a new pane to the application, because we’re displaying a different view structure from the one we had for the main application.
We give it a TemplateView for a child view, and then provide a template which will render an input field for the email and password. We also render out a button which will call an action on our statechart when we want to proceed. We also create a controller which holds the value of the email and password.
We now have two states. One is when the form is being displayed, and fields are enabled. Once we dealt with the cases where the email or password is empty, we determine that a request is valid and switch into the second state. This is the request state, where we would send the user’s information to the server and it would return successfully or return an error. For our purposes, I’ve just added a timeout of 250ms and then we proceed to the application’s ready state.
Conclusion
We’ve just roughed out a small application in SproutCore. There are some rough edges, especially with the styling, but it has some advanced functionality, and it shows how using things that come with SproutCore out of the box can help you quickly iterate and scale your application. For example, adding the sign in page required few changes to the existing code; writing this application also demonstrated how using bindings and statecharts help you easily manage your application flow and logic.
As most of us know, writing complex applications with any framework can be difficult. I hope these blog posts help you write applications in a way that allows your application structure to scale.
 [/caption]
